


As part of the Collective Construction in the Social Space workshop series organised by ACVic, this workshop was based on networked creative practices and self-managed collaborative strategies that seek to intervene in social processes through alternative citizen-focused systems.

The workshop aimed to design and construct street furniture elements that can activate and equip communal spaces. It also offered an opportunity to rethink the whole concept of street furniture. Similarly to the small, movable items that organise and equip our homes and workplaces, items of “furniture” are also used to organise and fit out communal or public spaces. Workshop participants explored the concept of street furniture from the perspective that its meaning can be as broad as we are capable of making or imagining it, and that our desires in relation to the city can be embodied in devices that are catalysts for social life: from guerrilla kitchens to media tanks, which can quickly transform any corner of the city into a party, a forum or a theatre, and promote its connection to communication networks.

The workshop built on work that had been carried out in Spring 2011 with members of La Torratxa self-managed social centre and the 15M movement in Vic. It was also based on a study of instances of non-regulated uses of urban public space, spanning from spontaneous artistic actions to citizen mobilisations, self-managed recycling projects and the fitting out of unoccupied urban sites.

Five mobile devices were designed and built during the workshop:
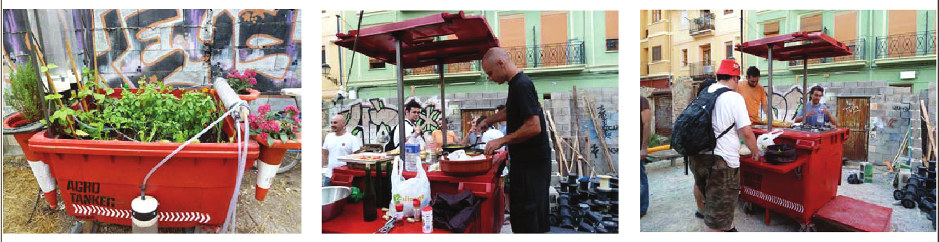
> Gastrotanker > the kitchen
> Agrotanker > the urban kitchen garden that complements and supplies the kitchen
> Mediatanker > technology hub, Wi-Fi Internet connection, communication, media, etc.
> Barratanker > bar/meeting point that complements the Mediatanker or Gastrotanker with extra furniture units
> Infotanker > made in response to a request for a new information point by members of Occupy Vic.

Each of these devices was made using customised dumpster bin adapted to fit the different uses. Before construction began, participants went on material recovery expeditions to municipal warehouses, rubbish dumps and scrap yards, which meant that most of the material employed to make the units was recycled. The finishing touch was to unify all of the prototypes using a single graphic style and colour.
The following describes how the Agrotanker and the Mediatanker were made:

AGROTANKER
The Agrotanker garden unit was intended to complement the kitchen, so it includes vegetables and herbs as well as decorative plants. As it was important to ensure that the unit would be relatively autonomous in terms of watering, the design included a series of water deposits that hang above the soil surface in such a way that the water pressure allows the plants to be watered. Nozzles placed on the ends of the tubes attached to the deposit made it possible for the water to reach the soil drop by drop. We also discovered the potential added value of the horizontal tube, and decided to install a manual foot pump to make the best of this. By means of manual pressure applied to the foot pump, the pressurized air inside the tube forces the water through the nozzles and allows users to cool themselves with a refreshing mist when temperatures get very hot. The existing assembly system of the metal profiles we recycled means that the structure that holds the deposits in place on the side of the container is detachable. Meanwhile, recycled road cones were turned upside down and transformed into planter boxes, which were the signature detail that set the Agrotanker apart from the other units.
Inventory:
1 large plastic dumpster bin | 3 large plastic cones (h: 70-80 cm) | 2 small plastic cones (h: 40 cm) | metal profiles | 1 plastic drum | plastic water bottles (empty) | plastic tubes – several | clear plastic tubes Ø10 and L=84cm | rubber tubes, several diameters | foam pieces t: 15cm | plastic nozzles (watering) | plastic taps | black duct tape | 1 5L foot pump | glue | metal hooks | metal bar | rivets | screws | nuts | washers | Trespa panels t:1cm | red lacquer paint | primer | substrate 280L approx. | volcanic stone | geotextile | vegetables, herbs and a mix of other plants.
Method:
1. -The dumpster bin
First, we reduced the size of the container to around 90 cm in order to make it easier for users of the device to reach and use it. We cut the actual side of the dumpster down to 90 cm and then reinforced it by attaching some 1 cm thick Trespa strips to the plastic with rivets. This gave us a total thickness of around 20 mm. Then we perforated the base of the container at the lowest points were water would build up, in order to allow it to drain.
2.-Structure of the deposits
The next step was to plan and build the structure to hold up the watering deposits. We decided to take advantage of some metal profiles we had recycled, which were designed to fit together. We cut them to size and welded them to create the upper (visible) structure. We also cut two more sections and attached them to one of the sides of the dumpster by means of fixed screws. The upper part fits into the lower part, and is held together with another screw. This makes it quite strong and allows it to be dismantled. The soil and gravel will also strengthen the structure and make it more stable, preventing the profiles from moving around too much.
3.-The planter-cones
We attached the cones on two sides: they were screwed into the upper side of the dumpster, and attached to the side using screw rods and nuts so that they would remain vertical. The way the rods are placed means that the cones can be detached, making it easier to transport the unit.
4.-The clear tubes
The watering tubes and the horizontal tube were put together in the same way. First we cut them to the required size, and then we cut circular stoppers out of foam to the required diameter. We made holes for the tubes to fit into, and then attached the other necessary pieces (taps, etc.)
Two metal rings made out of aluminium sheeting were used to attach the horizontal tube to the container at the desired height. The vertical tubes hang from the structure on metal hooks.
5.-The paint
Once we had attached all the structural, fixed elements, we removed or covered the parts that we didn’t want to paint, and then let loose with an air compressor and paint gun. First the primer and then the finishing coat, in this case glossy red.
6.-The plants
To finish off, only the most important thing was missing: the contents! Thinking in construction terms, in order to avoid filling the whole container with soil and to be resource-efficient, we created a kind of formwork using a plastic drum cut in half, empty water bottles, and unused pieces of tubes. This allowed us to raise the floor level while minimising the weight as much as possible. Then came a layer of geotextile, then volcanic gravel, geotextile again, and the substratum, to a total thickness of about 40 cm (10 + 30). We followed the same procedure for the planter-cones. Once the plants were in the soil, the watering tubes were arranged on the surface.

THE MEDIATANKER
Like all the other units (except the Agrotanker), the Mediatanker was designed to be fully compactable for ease of storage in. This meant that any elements attached to the dumpster ideally had be removable and storable inside it, so that the whole unit would take up the minimum space possible, which is the space of the actual container. The main purposes of the Mediatanker are to provide free, open Internet access and computer and audiovisual support and functionalities to citizens in public space. It is a media-hub that can be used for all kind of related purposes, from DJ sets to projections, visuals, WI-FI, public Internet hub, communication, etc. The person operating the Mediatanker equipment works inside the dumpster, entering through the back. Inside the container there is a folding chair and a board on which to place a PC, for example. Another board attached to the lid of the dumpster can be used to hold music and video equipment. The technological equipment is fragile and sensitive to water and heat, so we included a small roof to cover the unit, which can also be used to hold a projector for outdoor screenings. This roof is placed on tubes that are attached to the container. It can be dismantled so that the unit can be closed and all the material placed inside. In this case, the finishing touch was a pair of tubular sections to hold the speakers in place….
Inventory:
1 dumpster bin | wooden counter | metal profiles, 6x6cm, 4x4cm | metal tubular section, Ø3cm | textured plastic sheet | 2 wooden boards | wooden slat t:7mm | Plastic from recycled basketball hoop | wooden chair | plastic handle | L-shaped metal profile 2x2cm | 2 hinges | 2 folding metal squares | rivets | screws | nuts | washers | red lacquer paint | primer
Method:
1. -The interior
The first thing we did was cut the wooden counter to fit the base of the container and then place it inside, so as to provide a floor. Two more sections had to be cut and placed inside to cover the whole surface.
2. -The container
No significant changes were made to the container itself, only a section of the back was cut to make an entrance for the Mediatanker operator. Metal hinges were attached to create a kind of door.
3.- The roof and its structure
We welded the three 6 x 6 tubular sections into a U-shape and attached them to the container. To make the roof surface, we used a grid structure made out of metal tubes. We cut it to the desired shape, and then attached the plastic sheet to it with rivets, and used the wooden slat to cap it. Then we screwed two more 4 x 4 metal profiles were onto the grid. These fit into the 6 x 6 profiles, and meant that the roof could be dismantled.
4.- Fit-out
The furnishing elements that would go inside the container were created at the same time as the structure, although they were not placed inside until the very end.
5.-The paint
Once all the structural, fixed elements were had been assembled, we removed or covered all the parts that we didn’t want to paint, and then let loose with the air compressor and paint gun. First the primer, and then the coat of paint that will provide the finish, in this case, glossy red.
6.-Details
Once all the pieces were made and the tank was painted, we assembled all the elements and for the finishing touch, we attached the loudspeakers. It should be noted that the Mediatanker is a work in progress, and there are plans to continue to optimise it. On the day we presented all the units, we didn’t have light, or a projector… but even so, the effect was awesome!
(descriptions of the assembly process by: Marta Carrasco, Mixit[é])
credits:
workshop directed by: David Juárez (straddle3) and Diego Peris (todo por la praxis), with the collaboration of Santiago Cirugeda and Daniel Miracle
participants: Alba Gou, Albert Castells, Ana Feijão, Ana Raquel Cevallos, Ana Rita Rabaça, Angela Pachón, Antonia Suñer, Arnau Roquer, Catarina Cabral, David Martí, David Orriols, Dolça Grabulòs, Eduard Grabulòs, Enric Sánchez, Eva Reyes, Francisco Esteva, Germán Castro, John Alejandro Rico, Jordi Farrés, José Milara, Juan Martin, León Arellano, Marta Carrasco, Mia Guiteres, Monica Prats, Paula Andrea Bermúdez, Sergi Selvas Gardeñas, Unai Reglero, Xavier Manzanares and Yaiza García.
production: ACVic Centre d’Arts Contemporànies. materials research coordinated by Ana Rita Rabaça and Catarina Cabral.
Thanks to: Carles Arumí, Bruna Dinarés, Centre Social Autogestionat La Torratxa, Acampada de Vic, TC Torelló, Deixalleria de Vic.
more info:
http://straddle3.net/constructors/projects/74.en.php